
Remember those old boxes of CDs, tapes, and dusty manuals? Yeah, they’re about as useful as a rotary phone these days.
The world has gone digital, and people are buying tons of online stuff, like ebooks, music, templates, and even courses!
In fact, the market for these digital treasures is expected to be worth over $482 BILLION by 2025! That's a lot of zeros, and it means people are hungry for cool, instant, and useful stuff - stuff you can create!
The best part? You don’t need a fancy degree or a team of tech wizards to join the party. With the right tools and a little guidance (that’s where we come in!), you can build your own thriving online empire of downloadable products, right from your home!
Just imagine the ebook you’ve been writing, those amazing photos you take, and the skills you’ve learned, they can all become valuable downloads that make you money, reach new people, and share your expertise with the world!
If you are wondering how would you do that, we have got you covered.
Today, we are going to share how to create a digital download website on WordPress in just 7 steps to sell any type of digital product or assets.
Excited? Perfect, let’s go!
Why You Should Create a Digital Download Website in 2024

Digital products are exploding. With low barriers to entry and high scalability, downloadable websites offer immense potential for creators and businesses alike.
Here are five reasons why you should consider creating your own digital downloads website:
Tap into Growing Markets: With more people turning to online platforms for their needs, there’s a vast market waiting to be explored. Creating a digital downloads website allows you to reach a global audience and capitalize on this growing trend.
Passive Income Potential: Digital products offer the advantage of passive income generation. Once created, they can be sold repeatedly without the need for physical inventory or shipping costs.
Flexibility and Creativity: Whether you’re an artist, writer, musician, or educator, a digital downloads website provides a platform to showcase your talents and creativity. From eBooks and artwork to music tracks and educational resources, the possibilities are endless.
Be Future-Proof: Your website is your own space, unlike social media profiles that can change or even disappear. Your content stays accessible as long as you want it to be.
Control Over Distribution: Unlike traditional retail channels, where third-party distributors may dictate terms and pricing, owning a digital downloads website gives you full control over distribution and pricing strategies.
5 Things to Consider Before Starting a Digital Downloads Website
Now if you are convinced that you should create a digital products website, let us show you a few things to consider before starting your website:
Finding Your Toolkit: Choosing the right platform like WordPress and plugins like Download Monitor is vital. This can make the whole process a lot easier.
Knowing Your Audience: Who are you creating for? Analyze their needs, interests, and preferred formats to ensure your downloads resonate deeply.
Sizing Up the Competition: Research similar websites in your niche. Learn from their strengths and weaknesses to carve out your unique space.
Budgeting for Success: You must identify the factors in platform costs, marketing expenses, and potential investment in creating high-quality downloads. Plan realistically and track your expenses.
Planning for Marketing: Don’t expect downloads to magically appear! Craft a solid marketing strategy using social media, collaborations, and targeted ads to reach your audience.
Most Popular Digital Download Products That People Are Looking for Online
As we said earlier, the digital products industry is exploding with hundreds of new online shoppers every day.
However, in this part, we will take a quick look at the most popular digital products that are currently dominating the digital downloads market.
| Product Name | Market Size (USD Billion) | Growth Rate (% CAGR) | Example |
| eBook and PDF | 27.2 | 7.2 | Fiction novels, educational guides |
| Online Course | 31.5 | 14.3 | Skills development, career training |
| Template | 3.0 | 12.5 | Website design, social media graphics |
| Digital Asset | 5.9 | 14.0 | Stock photos, illustrations, sound effects, fonts |
| Music | 16.2 | 5.9 | Streaming subscriptions |
| Software | 411.0 | 5.5 | Productivity tools, business applications |
| Video Game | 175.8 | 9.6 | Mobile games, PC games, console games |

Download Monitor
Grow your audience, track download performance, and convert your leads into paying customers with an easy-to-use digital downloads solution for WordPress
How to Create a Digital Download Website on WordPress: 7 Steps to Follow
Creating a digital download website isn’t that complicated. However, it could be complicated if you don’t follow the right procedure.
To keep you on the right track, in this segment, we are going to show you 7 steps to build your own digital downloads website.
Here are the 7 steps to build a digital download website:
- Register a Domain Name
- Buy a Hosting Plan
- Install WordPress on Your Control Panel (cPanel)
- Choose a Suitable WordPress Theme
- Install the Download Monitor Plugin
- Customize the Basic Settings of the Download Monitor Plugin
- Upload and Display Your Downloadable Products
Now let’s discuss each of the above mentioned points in detail and get started with the first point –
Step 01: Register a Domain Name
Your domain name is your website’s identity, the unique address people type in to reach your downloadable treasures.
So, take time to come up with a sweet, simple, and easy-to-remember domain name.
Follow these hacks while registering the domain name for your digital downloads website:
a) Brainstorming
Brandability: Choose a name that’s catchy, memorable, and reflects your brand identity.
Availability: Check if your desired domain name is available using a domain registrar’s search tool.
b) Choosing an Extension
.com: The most popular and versatile option for businesses and individuals.
.org: Often used by non-profit organizations and educational institutions.
New extensions: Consider newer extensions like .co or .io for a unique touch.
c) Where to Register
Domain registrars: Companies like GoDaddy, Hostinger, and Google Domains, etc. offer domain registration services.
Web hosting providers: Some web hosting providers also offer domain registration bundled with their plans.
d) Tips for Success
Keep it short, sweet, and easy to spell.
Avoid hyphens and numbers.
Consider buying multiple variations to prevent typosquatting.
By following these steps, you can register a domain name that will serve as a strong foundation for your successful digital downloads website!
Step 02: Buy a Hosting Plan
Now that you’ve claimed your domain name, it’s time to find a home for your website files- a hosting plan. Choosing the right hosting plan ensures smooth operation and avoids potential headaches down the line.
Here’s your guide to navigating the hosting world:
a) Shared Hosting vs. Dedicated Hosting
Dedicated Hosting: This gives you dedicated resources and more control, but comes at a higher cost. Best for larger websites with high traffic or specific performance needs.
b) Factors to Consider
Storage space: How much data will your website need (downloads, images, etc.)?
Bandwidth: How much data transfer can your website handle (visitor traffic)?
Security features: Does the plan offer essential security measures like SSL certificates and backups?
Customer support: Will you have reliable support if you encounter issues?
c) Popular Hosting Providers
Bluehost
SiteGround
DreamHost
HostGator
GoDaddy
d) Tips for Choosing a Hosting Provider
Read reviews and compare plans from different providers.
Look for special offers and introductory discounts.
Don’t be afraid to ask customer support questions before buying.
Step 03: Install WordPress on Your Control Panel
Once you've secured a domain name and purchased a hosting plan, the next step in creating your digital downloads website is installing WordPress on your hosting account's control panel.
WordPress is a popular and user-friendly content management system (CMS) that powers millions of websites worldwide, offering a flexible and customizable platform for building websites of various types and sizes.
To install WordPress on your hosting account, follow these steps:
a) Access Your Hosting Control Panel
Login to your hosting account, and navigate to the control panel (cPanel) provided by your hosting provider.
You can typically access cPanel by entering your domain name followed by “/cpanel” in your web browser’s address bar.
b) Locate the WordPress Installer
Once you’re in cPanel, look for the “Softaculous Apps Installer” or “WordPress Installer” icon.
This tool simplifies the process of installing WordPress by automating most of the steps.
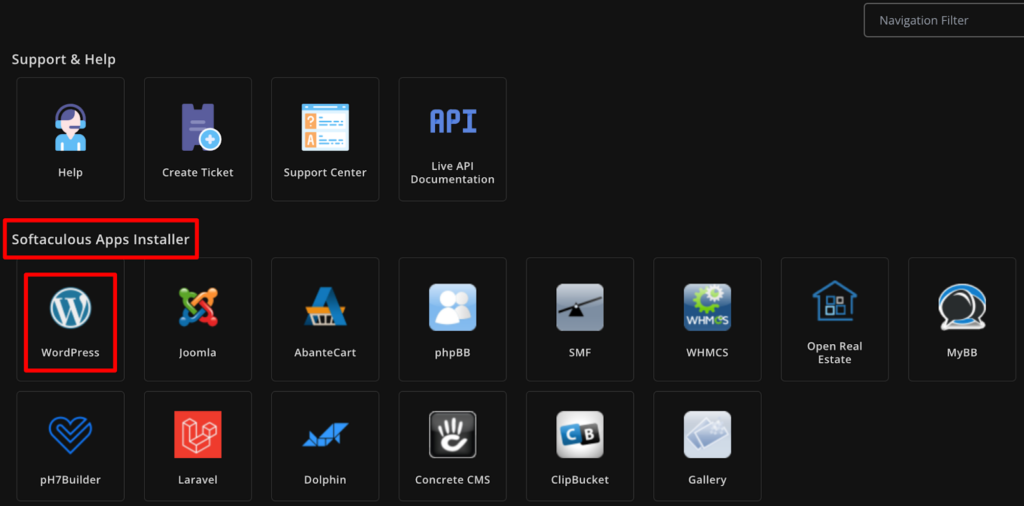
c) Select WordPress for Installation
Click on the WordPress icon to launch the installation wizard. You’ll be prompted to choose the domain where you want to install WordPress if you have multiple domains associated with your hosting account.
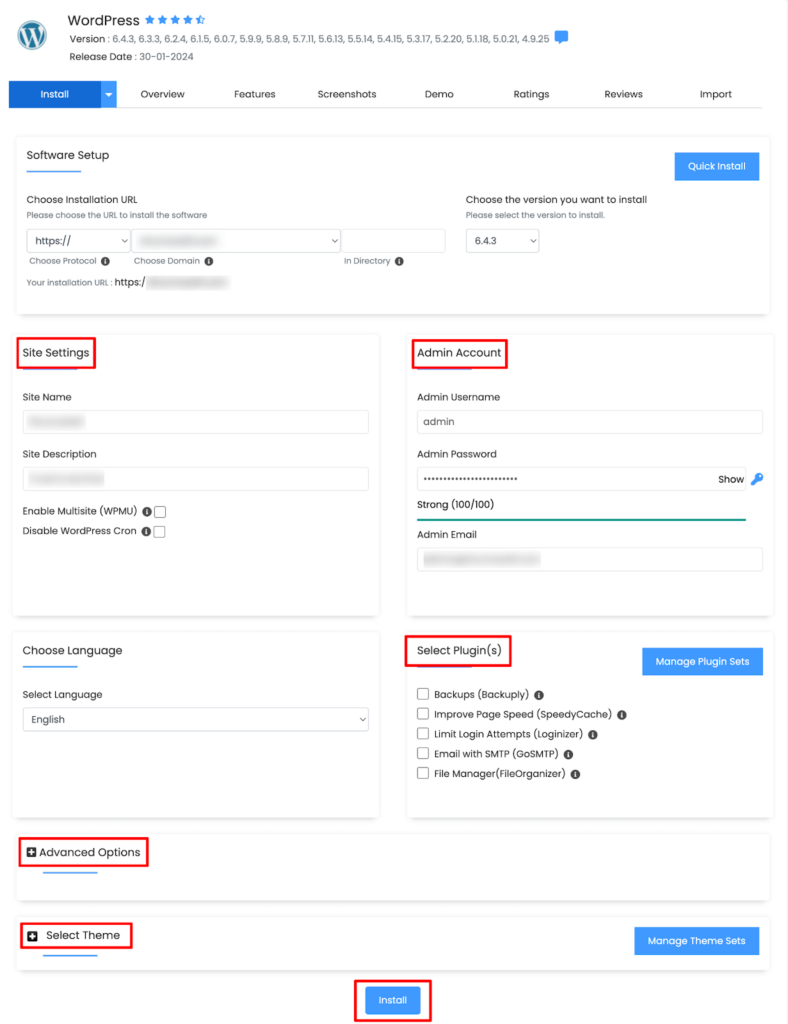
d) Configure Installation Settings
Fill in the required information, such as the site name, site description, admin username, and password.
Make sure to choose a strong password to secure your WordPress admin area.
e) Complete the Installation
Review your settings, double-check everything, and click the “Install” button to begin the installation process. The installer will automatically create the necessary database and configure WordPress for you.
Once the installation is complete, you’ll receive a confirmation message with a link to your WordPress dashboard.
This is where you’ll manage your website, create content, install themes and plugins, and customize your site’s appearance and functionality.
Download Monitor
Grow your audience, track download performance, and convert your traffic into email subscribers with an easy-to-use digital downloads solution for WordPress.
Step 04: Choose a Suitable WordPress Theme

Selecting a suitable WordPress theme is a critical step in creating your digital downloads website. A WordPress theme dictates the overall design, layout, and visual appearance of your website.
So, it’s essential to choose one that aligns with your brand identity, content type, and target audience.
Here’s how to choose a suitable WordPress theme:
a) Browse Theme Marketplaces
Explore reputable WordPress theme marketplaces such as ThemeForest, Elegant Themes, or the WordPress Theme Directory.
Use filters and search options to narrow down themes based on criteria like industry, layout style, features, and ratings.
b) Consider Design and Customization Options
Review theme demos to assess their design aesthetics, layout structures, and customization options.
Look for themes that offer flexibility in customizing colors, fonts, page layouts, and other design elements to match your branding and preferences.
c) Read User Reviews and Ratings
Take time to read user reviews and ratings to gauge the theme’s quality, performance, and support responsiveness.
Pay attention to feedback regarding ease of use, code quality, update frequency, and customer support to make an informed decision.
d) Consider Premium vs. Free Themes
Decide whether you prefer a premium (paid) theme or a free theme.
Premium themes typically offer more advanced features, customization options, and support, while free themes may have limited features but can be a cost-effective option for budget-conscious users.
e) Install Your Chosen Theme
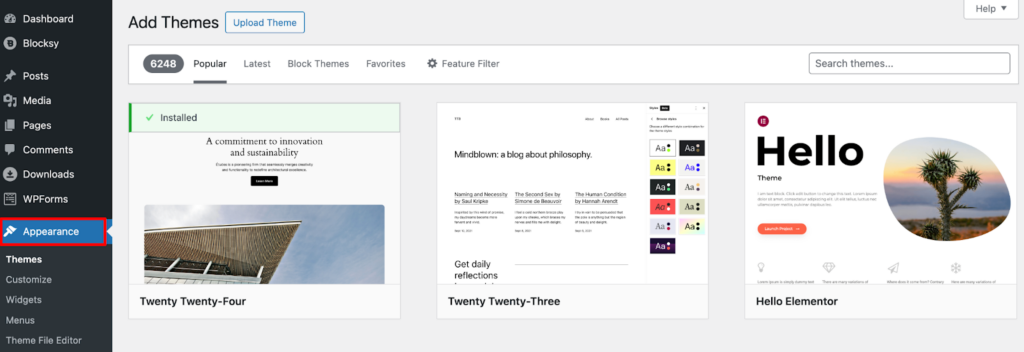
After finalizing the best-suited theme for your website as per your needs, it’s time to install that theme on your site.
To install a theme, go to your WordPress dashboard -> Appearance -> Themes, then click on the upload button if you want to upload a theme from your local storage, otherwise, type the theme name on the search box and install the theme from the search result.
Step 05: Install the Download Monitor Plugin

Now that your WordPress website is dressed and ready, it’s time to equip it with the essential tool for managing your downloadable content- the Download Monitor plugin.
This powerful plugin transforms your website into a streamlined download hub, allowing you to easily add, manage, and track your valuable creations.
Let’s dive into the installation process:
Search for “Download Monitor” and select the official plugin from WordPress.org.
Click “Install Now” and wait for the installation to complete.
Once installed, click “Activate” to start using the plugin.
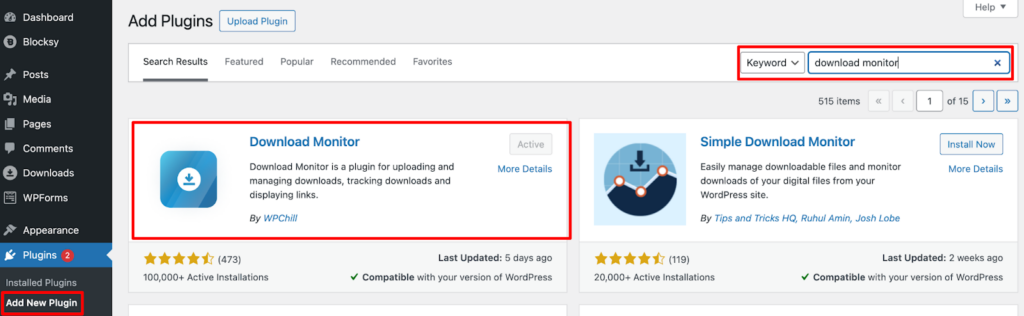
That’s it! That’s how you should install and activate Download Monitor plugin. Now let’s move on to the next step!
Step 06: Customize the Basic Settings of the Download Monitor Plugin

Customizing the basic settings of the Download Monitor plugin is essential to tailor its functionality to your specific needs and preferences. These settings allow you to control how your downloadable products are displayed, managed, and accessed on your website.
Here’s how to customize the basic settings:
However, if you want to sell digital products from your site, you need to prepare your site for that. Follow these steps to do that!
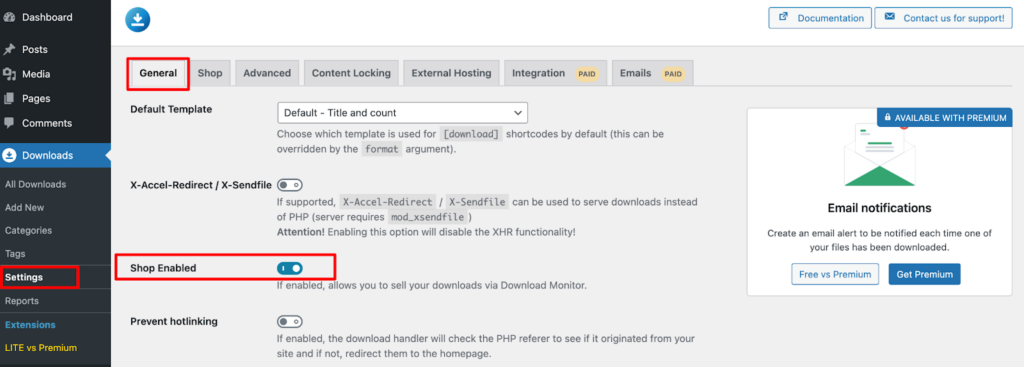
i) Enable Shop Feature
The first thing that you need to do is enable the “Shop” feature of the Download Monitor plugin. In order to enable the Shop feature, go to your WordPress dashboard and then navigate to Downloads -> Settings -> General -> check the “Shop Enabled” box.
ii) Create a No Access Page
If you are using the latest version of the Download Monitor plugin, the No Access should already be there.
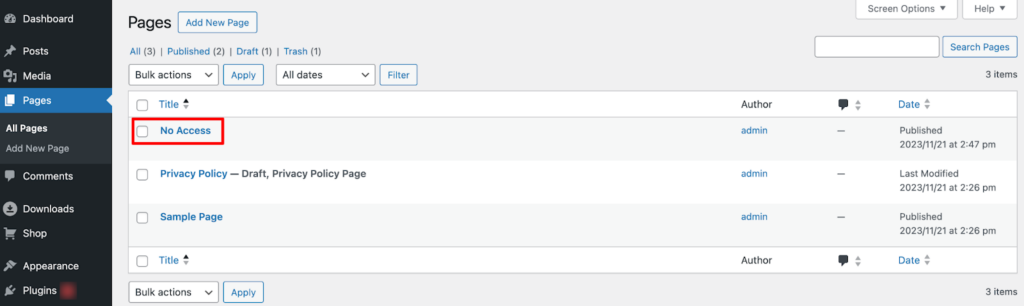
However, if the page isn’t there by default, simply, create a page.
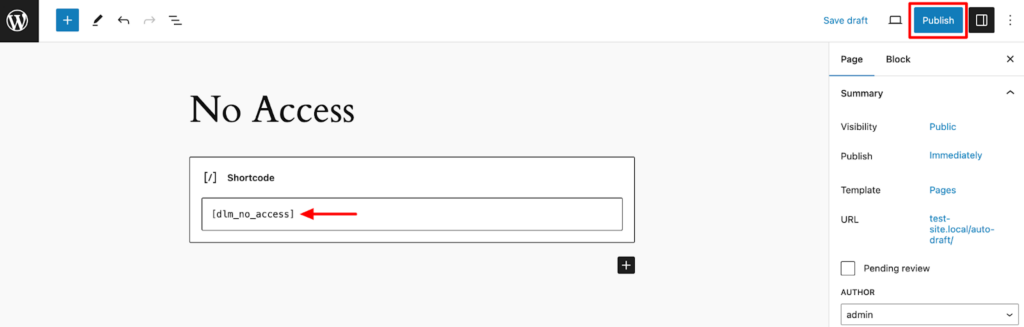
[dlm_no_access]
To do that, insert the Shortcode block and then paste this code to get your job done. Then publish the page by clicking the “Publish” button.
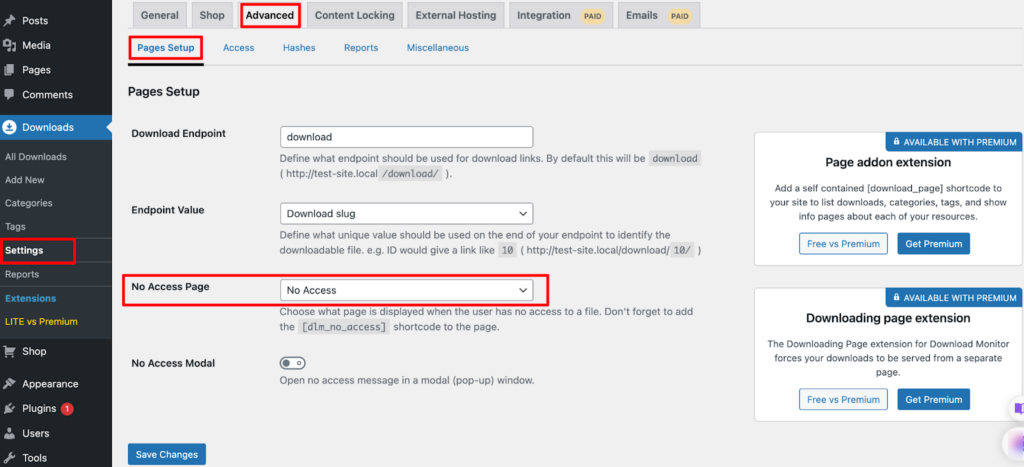
Now go to Downloads -> Settings -> Advanced -> Pages Setup -> No Access Page – select the page you created above which is the No Access page.
Then hit the Save Changes button to save all the changes.
iii) Create a Cart Page
Now you need to create a cart page. Creating a cart page is almost similar to creating the above-mentioned No Access page.
Go to your WordPress dashboard -> Pages and click on the Add New Pages option. Then name the page “Cart Page”. Now add the [dlm_cart] shortcode to the page.
Finally, click on the “Publish” button to publish the page.
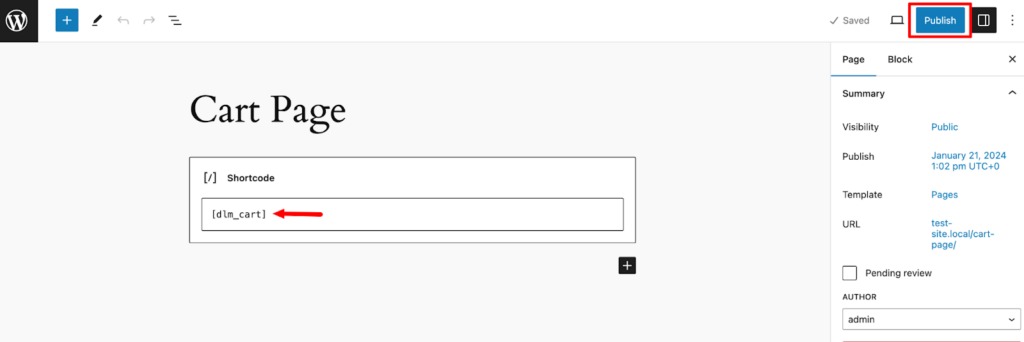
After you’ve published this new page, go to Downloads -> Settings -> Shop. In the Pages tab, select your newly created page as your cart page. Click Save Changes and you’re done.
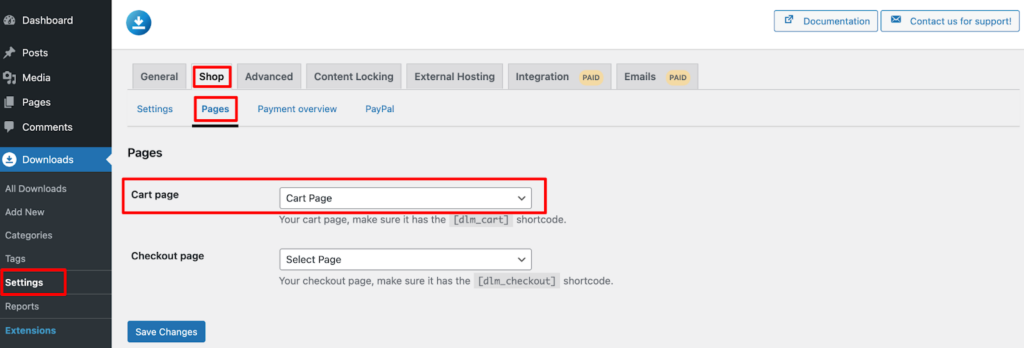
iv) Create a Checkout Page
There is one more page you need to create, and that is the checkout page. Following the same procedure, create a new page and give this page a name, e.g., Checkout Page.
Then add this shortcode to the page: [dlm_checkout]. Then simply publish the page.
Once you have published the page, go to Downloads -> Settings -> Shop. In the Pages tab, select your newly created page as your checkout page.
Then click on the “Save Changes” button to complete the process.
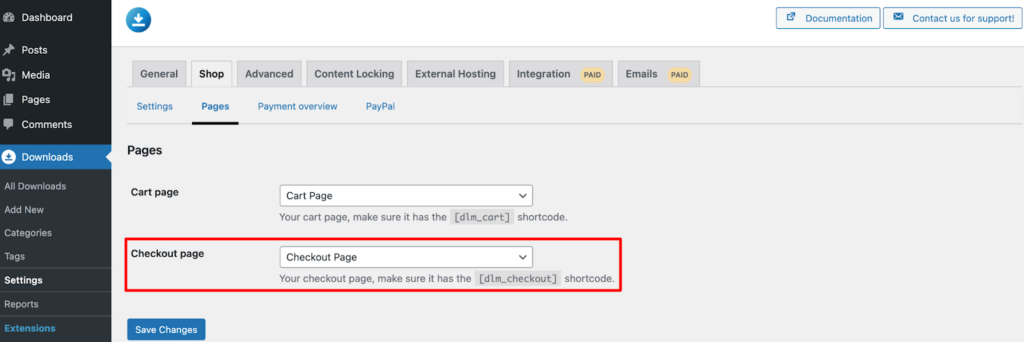
v) Set up Payment Gateway
To accept payments, you’ll require a payment gateway. By default, the Download Monitor core plugin comes with the PayPal payment gateway.
It allows you to accept payments via PayPal around the world.
To use PayPal on your digital downloadable site, you’ll be required to do 3 things:
- Enable PayPal on your site
- Create a PayPal account
- Connect your PayPal account with your site
First, check how to enable PayPal on your site. Navigate to your WordPress dashboard -> Downloads -> Shop -> Payment Gateway, and then enable PayPal.
Finally, click on the “Save Changes” button to save this change.
Now if you don’t have a PayPal account already, create a PayPal account first from the PayPal official site.
Then connect your PayPal account to your digital downloads site.

Check our step-by-step documentation to create and connect your PayPal account to your site.
Step 07: Upload and Display Your Downloadable Products
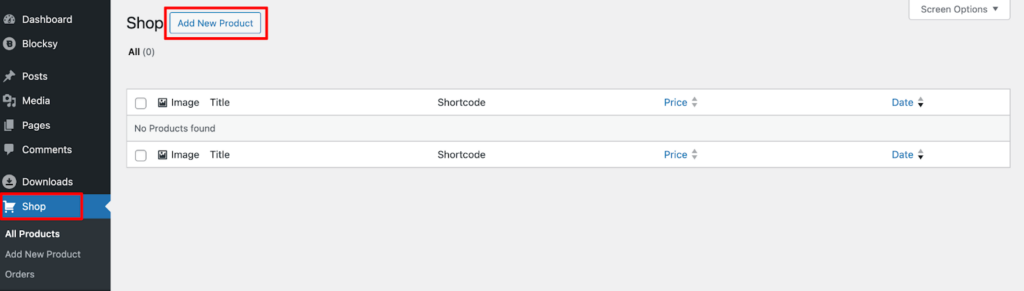
Now it’s time to upload your digital products. The uploading procedure is the same, no matter if it’s a software, PDF, or video game.
To upload a product, go to your WordPress dashboard and click on “Shop”. Then hit the “Add New Product” to start the uploading process.
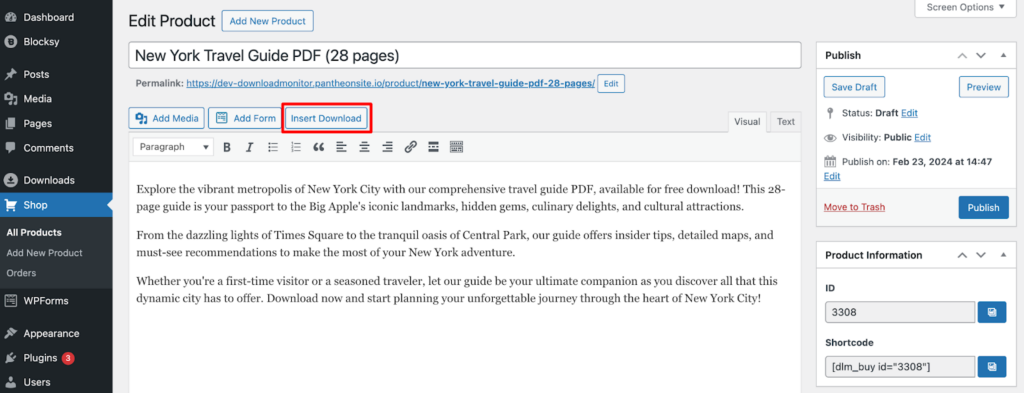
Now insert your product name and description. There is an option named “Insert Download”, click on that option to upload your digital product.
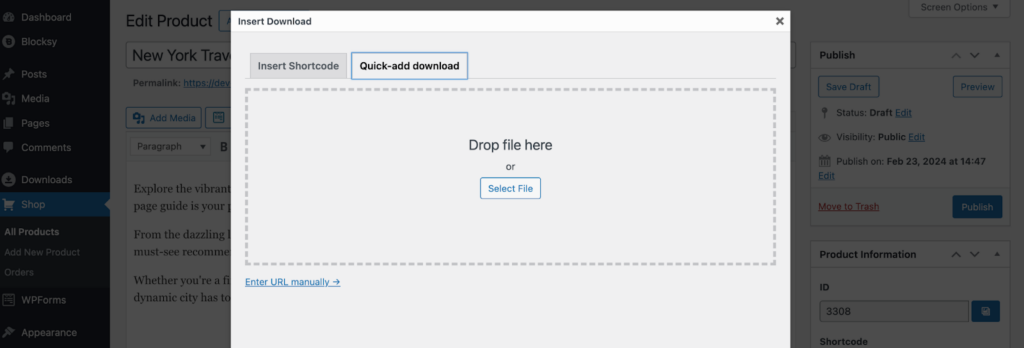
There you will find an option to upload your digital products from your local storage. Or, you can just drop your file here to upload it.
After uploading the product, scroll down a bit and there you’ll find options to set the product price and the download item. Also, don’t forget to upload the feature image to attract your customers.
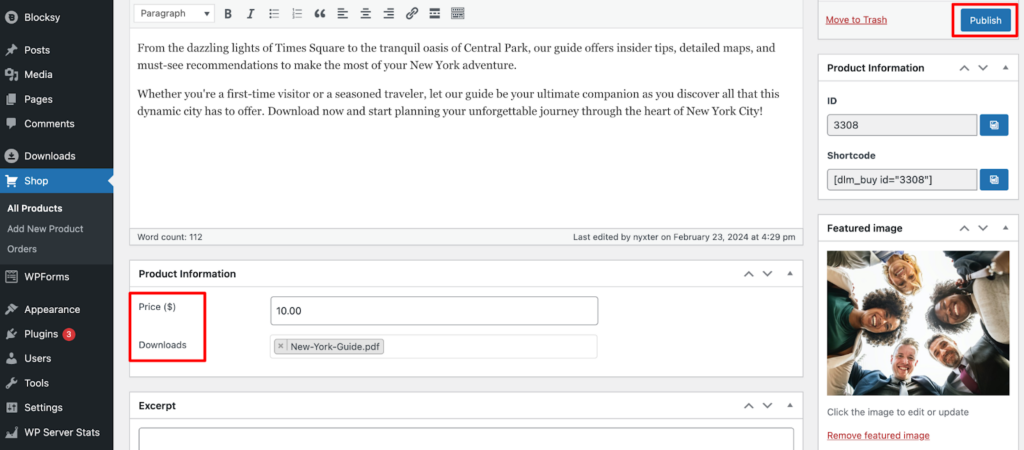
Once you’re done with this, simply hit the “Publish” button to publish this product. Now this product will be shown on your product page.
You can also show this product on any of your pages or posts. All you need to do is copy the Shortcode and paste it on where you want to show it.
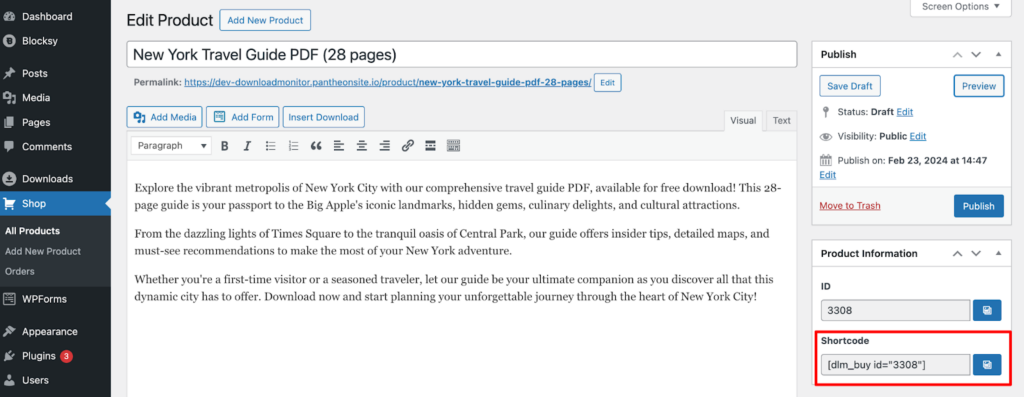
We have copied the Shortcode and we will show it on one of our blogs. So, go to blog editor and paste this code.
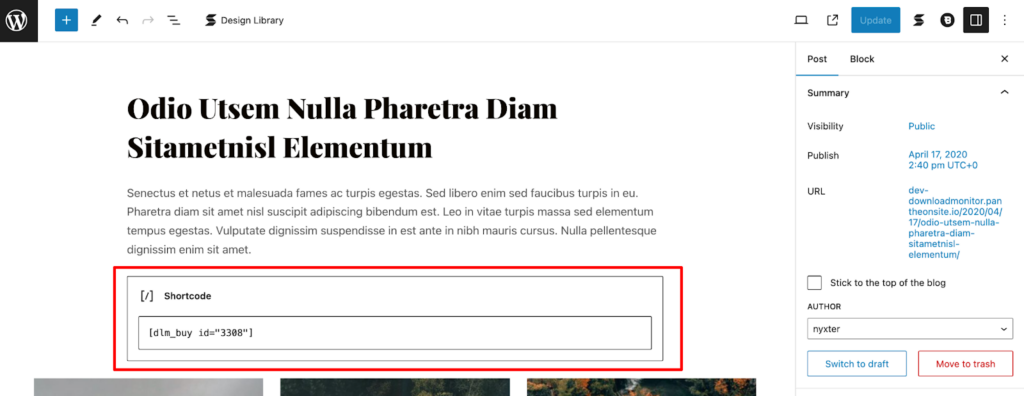
Now if you update the blog and check it from the frontend, you will see the download link there.
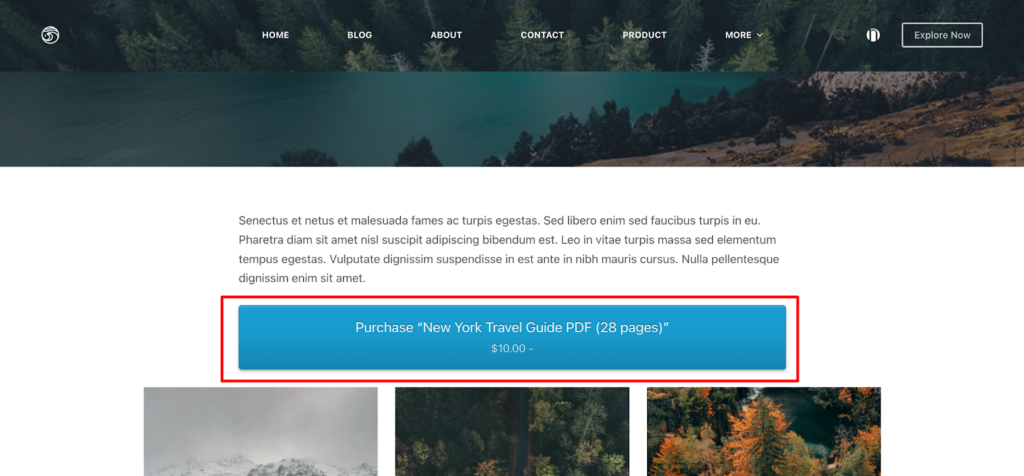
When your reader clicks on this link, it will take him to the cart page and eventually to the checkout page.
That’s how you can upload and display any digital products to your digital downloadable website.
Bonus: Must-have Plugins, Pages and Tools to Smoothly Manage Your Downloadable Products Website
Created your digital download website? But you aren’t done yet. You need to opt-in for a few required plugins and tools that will help you to manage your website seamlessly.
✅ First of all, let’s install these plugins:
- eCommerce Integration Plugin: If you want to sell your digital products with WooCommerce, you should install the WooCommerce plugin. It’s a free plugin. You can check our documentation to use WooCommerce with the Digital Download plugin. However, you can still sell digital products without using the WooCommerce plugin.
- SEO Plugin: Enhance the visibility of your downloadable products website in search engine results by installing an SEO plugin like Yoast SEO or Rank Math. These plugins help optimize your website’s content, meta tags, and sitemaps to improve search engine rankings and attract more organic traffic.
- Backup Plugin: Safeguard your website’s data and downloadable files by implementing a reliable backup solution. Plugins like UpdraftPlus or BackupBuddy allow you to schedule regular backups of your website files and database, ensuring that you can restore your website quickly in case of data loss or server issues.
- Security Plugin: Protect your downloadable products website from cyber threats and unauthorized access with a robust security plugin. Plugins like Wordfence Security or Sucuri Security provide firewall protection, malware scanning, and login security features to fortify your website’s defenses against hackers and malicious attacks.
- Contact Form Plugin: Allow visitors to inquire about your downloadable products or request support by integrating a contact form plugin. Plugins like Contact Form 7 or WPForms enable you to create custom contact forms and receive messages directly to your email inbox, facilitating communication with your audience.
- Caching Plugin: Improve the speed and performance of your website by using a caching plugin like WP Super Cache or W3 Total Cache. Caching plugins create static HTML versions of your web pages, reducing server load and speeding up page load times for visitors.
Required Pages List
After installing all those plugins, now make sure you have designed all these pages for a better user experience.
- Home Page: The homepage serves as the main entry point to your website and should provide an overview of your downloadable products, key features, and navigation to other important pages.
- Products Page: This page showcases your downloadable products, organized into categories or sections for easy browsing. Include product descriptions, images, pricing (if applicable), and download links or buttons.
- About Us Page: Introduce yourself or your brand to visitors and provide background information about your website, mission, and vision. Share your story, expertise, and any relevant credentials to build trust and credibility with your audience.
- Contact Page: Make it easy for visitors to get in touch with you by including a contact form, email address, phone number, or physical address. Optionally, provide links to your social media profiles for additional communication channels.
- FAQ Page: Address common questions and concerns that visitors may have about your downloadable products, purchasing process, or website policies. Provide clear and informative answers to help alleviate any doubts and facilitate decision-making.
- Terms of Service Page: Outline the terms and conditions that govern the use of your website and downloadable products. Cover important aspects such as user rights and responsibilities, copyright, licensing, refunds, and dispute resolution.
- Privacy Policy Page: Inform visitors about how you collect, use, and protect their personal information when they interact with your website. Include details about data collection methods, cookies, third-party services, and compliance with privacy laws.
- Blog: Maintain a blog or news section to share updates, announcements, industry insights, and helpful resources related to your niche or downloadable products. Regularly publishing informative content can attract and engage your audience while enhancing your website’s SEO.
Required Tools List
- Google Analytics: Track website traffic, user behavior, and download performance for valuable insights.
- Email Marketing Tool: Build an email list and send targeted campaigns to promote your downloads and engage with your audience.
- Social Media Management Tools: Schedule and manage your social media presence to promote your downloads and reach a wider audience.
- Payment Gateway: PayPal will be available by default with the Download Monitor plugin. Apart from PayPal, you should also integrate a few secure and reputable payment gateways to process transactions smoothly.
How to Build a Downloadable Products Website- Key Takeaways for You
Congratulations! You’ve reached the end of our roadmap to building your very own downloadable empire.
Remember, this is just the beginning, your digital journey is filled with endless possibilities.
Here are some key takeaways for you:
1️⃣ Remember, you’re not just selling products, you’re sharing valuable knowledge, creativity, and passion. Focus on the impact you want to make on your audience.
2️⃣ Selecting the right tools and plugins is crucial for optimizing your website’s functionality, performance, and user experience. With the right tools and resources, anyone can create a beautiful, functional website, even without coding experience.
3️⃣ Make your website a joy to navigate, with clear information, engaging design, and a smooth download process. Remember, happy users are returning customers!
4️⃣ High-quality, valuable downloads are the heart of your empire. Invest time and effort in creating content that resonates with your audience and solves their problems.
5️⃣ Don’t be shy! Share your website on social media, engage with communities, and utilize marketing strategies to reach your target audience.
So, that’s all from our end. Now it’s your turn! If you have any feedback related to this guide – how to create a digital downloads website, feel free to share it with us using the comment box below. We always appreciate your feedback. Thanks in advance.
Download Monitor
Grow your audience, track download performance, and convert your leads into paying customers with an easy-to-use digital downloads solution for WordPress
