
Businesses can provide a variety of file types for download, but PDF is one of the most popular. Why? Because they’re so versatile!
Tutorials, infographics, booklets, user manuals, product documentation, and many other tools and resources for users or clients are all examples of PDF files that your website visitors can download.
But how to link a PDF to a website in the first place?
This article will show you how to link a PDF to your website so your visitors can download them in just a few easy steps.
Despite PDFs being fairly easy to create, few businesses use them to their full potential. Some don’t even know how to link a PDF to a website. Here are some common reasons businesses fail when it comes to linking a PDF to a website:
❌ WordPress Core doesn’t offer PDF download options – WordPress’s core functionalities don’t let you set up downloadable content. You’ll have to find an alternative through other means (coding or plugins).
❌ Some plugins don’t have many options – Businesses that use plugins to deliver digital content to their users sometimes struggle with a minimal range of functionality. Not to mention other options, such as managing roles and special access to downloadable content.
❌ No data collection – Setting up downloadable content with coding has the downside of being hard to track. Goals can be set in Google Analytics, but it’s not the best option to gather insightful data about the downloads.
Why Have Digital Content As PDF Files?
The PDF file format is one of the most widely used today. When you produce a PDF file with any amount of data, such as text, photos, vector graphics, tables, and so on, it will always show that data in the same way regardless of where you view it.
PDF is a dependable format for exporting documents that you wish to share with others or release publicly, ensuring that the information you want to transmit is delivered as intended.
Therefore, no matter the purpose of the file (tutorials, infographics, booklets, user manuals, product documentation, samples, etc.), it will be well received and widely used by your users.
You can repurpose long guides and tutorials by turning them into PDF files. Then it’s easy enough to either make them available to users as special material or to use them to build an email list.
Another advantage of uploading PDF files is that they may be used to increase user engagement and reduce bounce rates. You may simply lower your high bounce rate by allowing your users to download PDF files and complete an action.
Can You Still Add Download Links Through WordPress?
If all you want to do is upload a single PDF file or two and share them with everyone on your site, this is the simplest option because it requires no plugin installation.
Submitting PDF files to your WordPress website is similar to uploading photos and other media resources.
To do so, navigate to Media in your WordPress admin section after logging in. After that, select “Add New” from the drop-down menu. Simply drag it into WordPress and drop it there, or use the “Select Files” tab to upload a PDF file.
After you’ve uploaded the PDF file, you’ll need to add it to your posts or pages.
It’s worth noting that WordPress doesn’t allow you to embed complete PDF documents by default. Instead, you can include them in your blog entries as download links.
You can present the download either through a clickable URL or button. Here’s how you can create both:
Download URL
To make an automated download link, you click on the three dots when you hover over the text and then on edit as HTML. Head back to the gallery and copy the file’s title. You’ll notice between the lines of code something like a href = “…”; but you want it to look something like a download=“copied title” href = “…”. If you preview your post and click on the link, the file should download automatically.
Download Button
On the same post, you can insert a button as you would normally do. You can play around with the colors and typography. After that, click on the link icon and paste the file URL from the gallery. If you preview this and click the newly added button, you’ll be redirected to the PDF document where you’ll have an option to print or download.
While these are simple ways to add a download link to your WordPress website, it involves some HTML knowledge that not many website owners know. These methods aren’t really useful when you plan on doing research based on your analytics. There is no way to “make” it track your downloads and store statistics for future use.
You can also impose restrictions on downloads by monitoring them. For example, you can permit clients to download their digital purchases only once daily.
How To Create a PDF Download Link With Download Monitor
Fortunately, with Download Monitor, learning how to link a pdf to a website is as easy as 1, 2, 3. Here’s how…
Step 1: Install Download Monitor
It’s very easy to set up Download Monitor. Like many other WordPress plugins, you can install the Download Monitor using the WordPress admin panel.
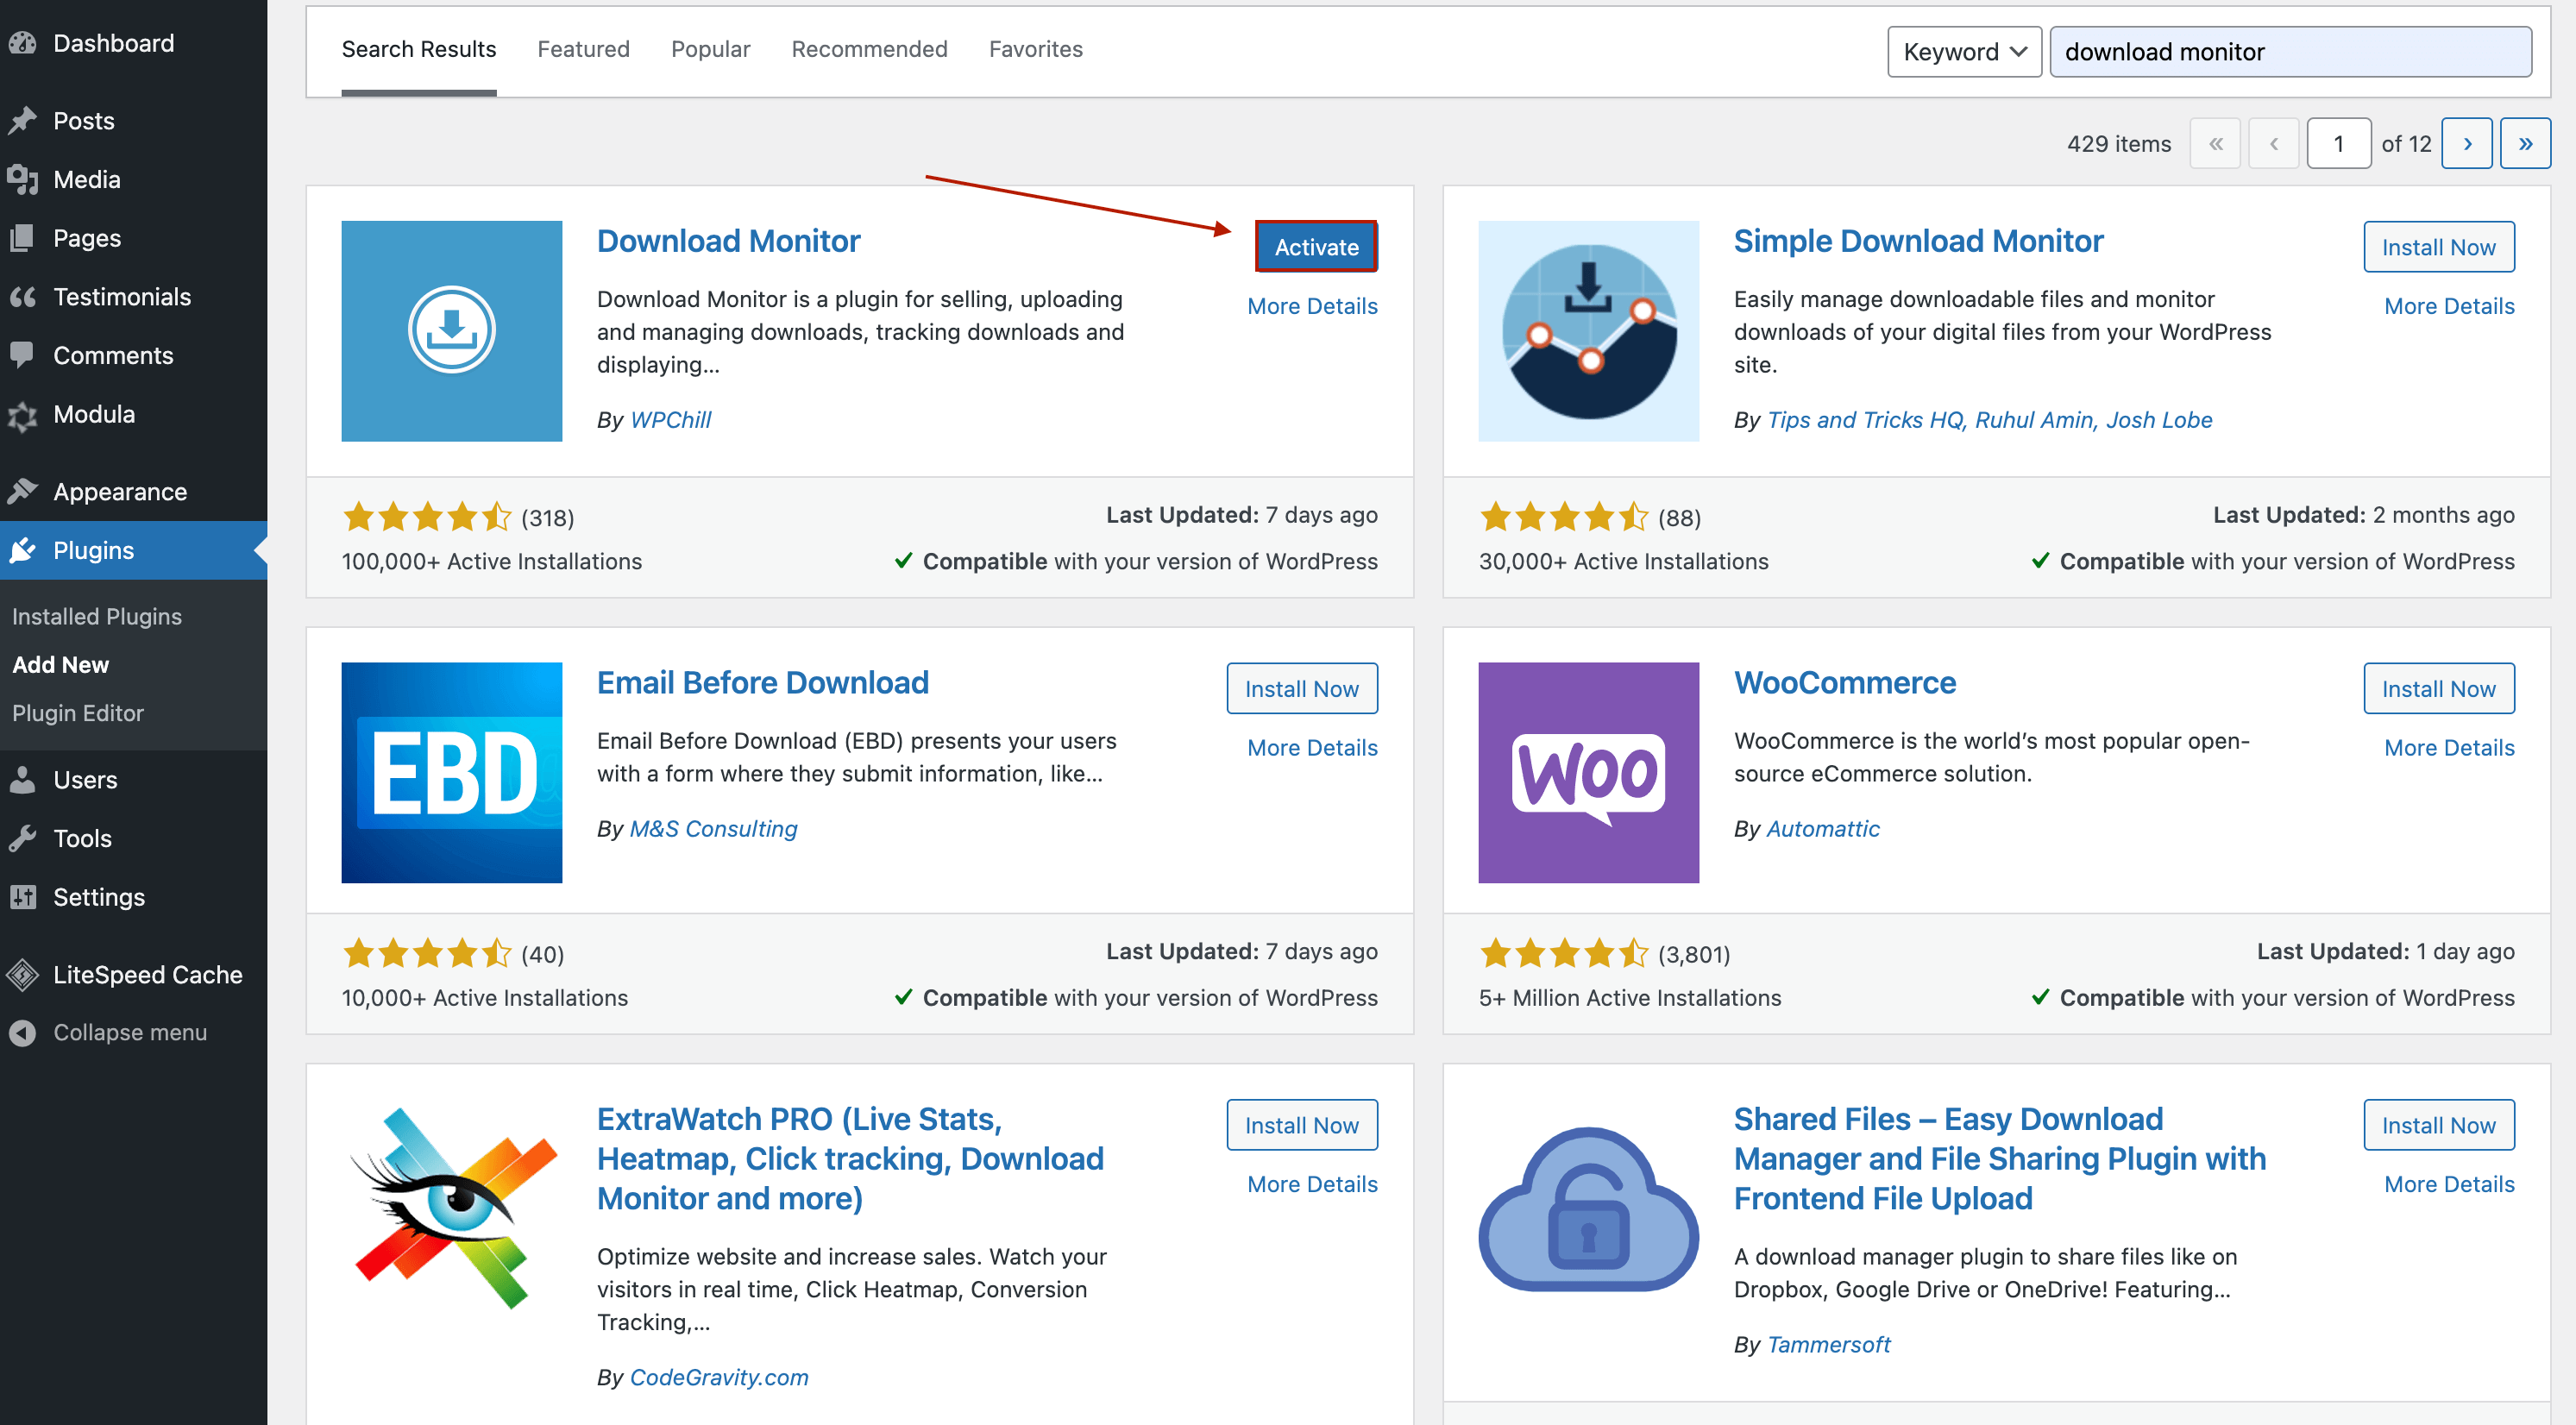
Simply go to Plugins > New Plugin, type Download Monitor into the search box, and click the “Install now” button.

After the installation is complete, don’t forget to click the Activate button.
To use the extensions mentioned in this article, you also need to have a pro version license, which includes all the advanced functionalities of the plugin.

Download Monitor
Grow your audience, track download performance, and convert your traffic into email subscribers with an easy-to-use digital downloads solution for WordPress.
Step 2: Add Your First PDF File
In this section, you’ll learn how to link a pdf to a website the right way.
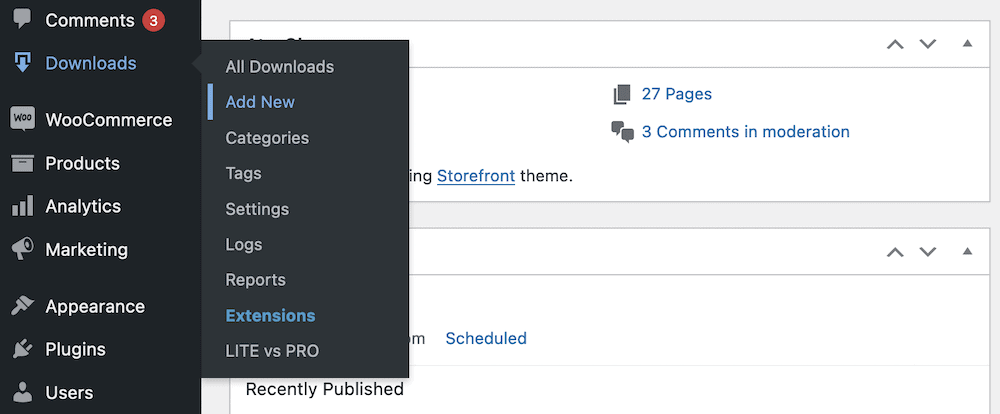
On your Dashboard sidebar, you’ll see a section called Downloads, which is where you may begin adding your files. Go to the downloads page or the sidebar and click “add file” to add your first PDF download.
You’ll note that the interface for creating a download is similar to posts and pages. Give your download a title and (optionally) some content.
One thing important to mention is that right under the download title, you’ll notice an Add Form button. With that, you can make users fill in a form before they can actually download the PDF file. This facilitates data collection and helps your business understand your customers better.
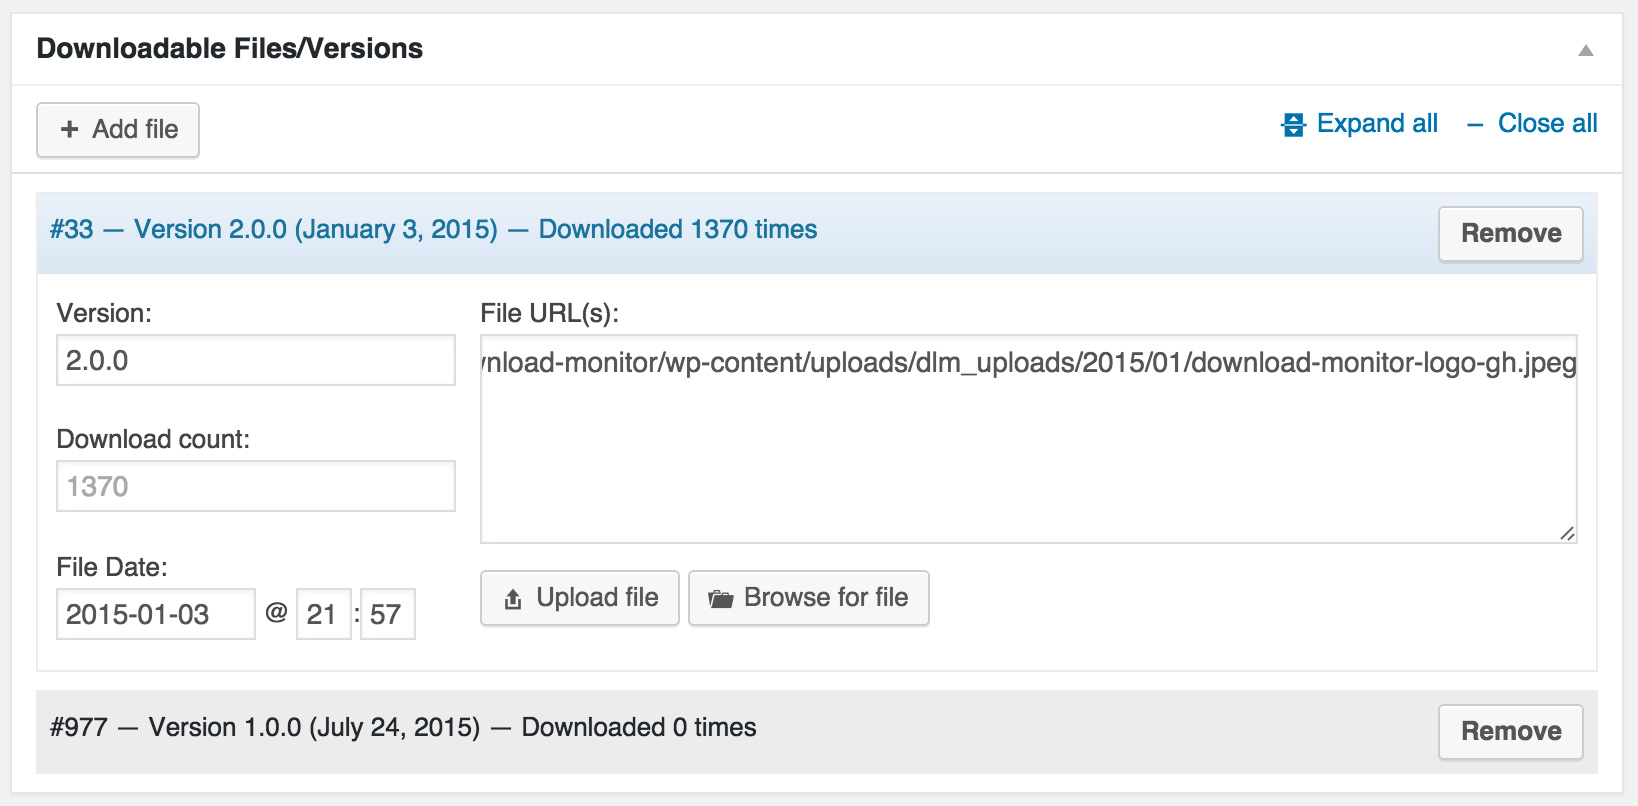
You can begin adding your files beneath the content area in the Downloadable Files/Versions section.
If your website has a ton of files, storing them on a different platform or cloud will save your website from heavy loading times. Not only that, but it will also have better download speed. We have two extensions that can help:
- Amazon S3: You can offer safe, expiring download links by linking to files hosted on Amazon S3. Using this extension, you can use non-public Amazon S3 links for Download Monitor files.
- Google Drive: This extension allows you to use your Google Drive files as Download Monitor files. The Google Drive extension recognizes your Google Drive URLs and ensures that they’re promptly integrated with your Download Monitor setup. The users will use the default Google Drive sharing URL but still through Download Monitor.
You’ll notice one of the features is the Version section. This is particularly useful if, for example, you have a company that sells household appliances and you provide your users with free user manuals in a PDF format. You can use this section if you often have manual versions updated and want to let users know what version they have and if they need an update.
Another notable feature is the File Date. Here, you can manually set up the date of the upload.
We even have a manual download count. It allows you to start the download count tracking at a specified number. Especially useful if you are bringing in your downloads from another system and don’t want to start the tracking at 0 again.
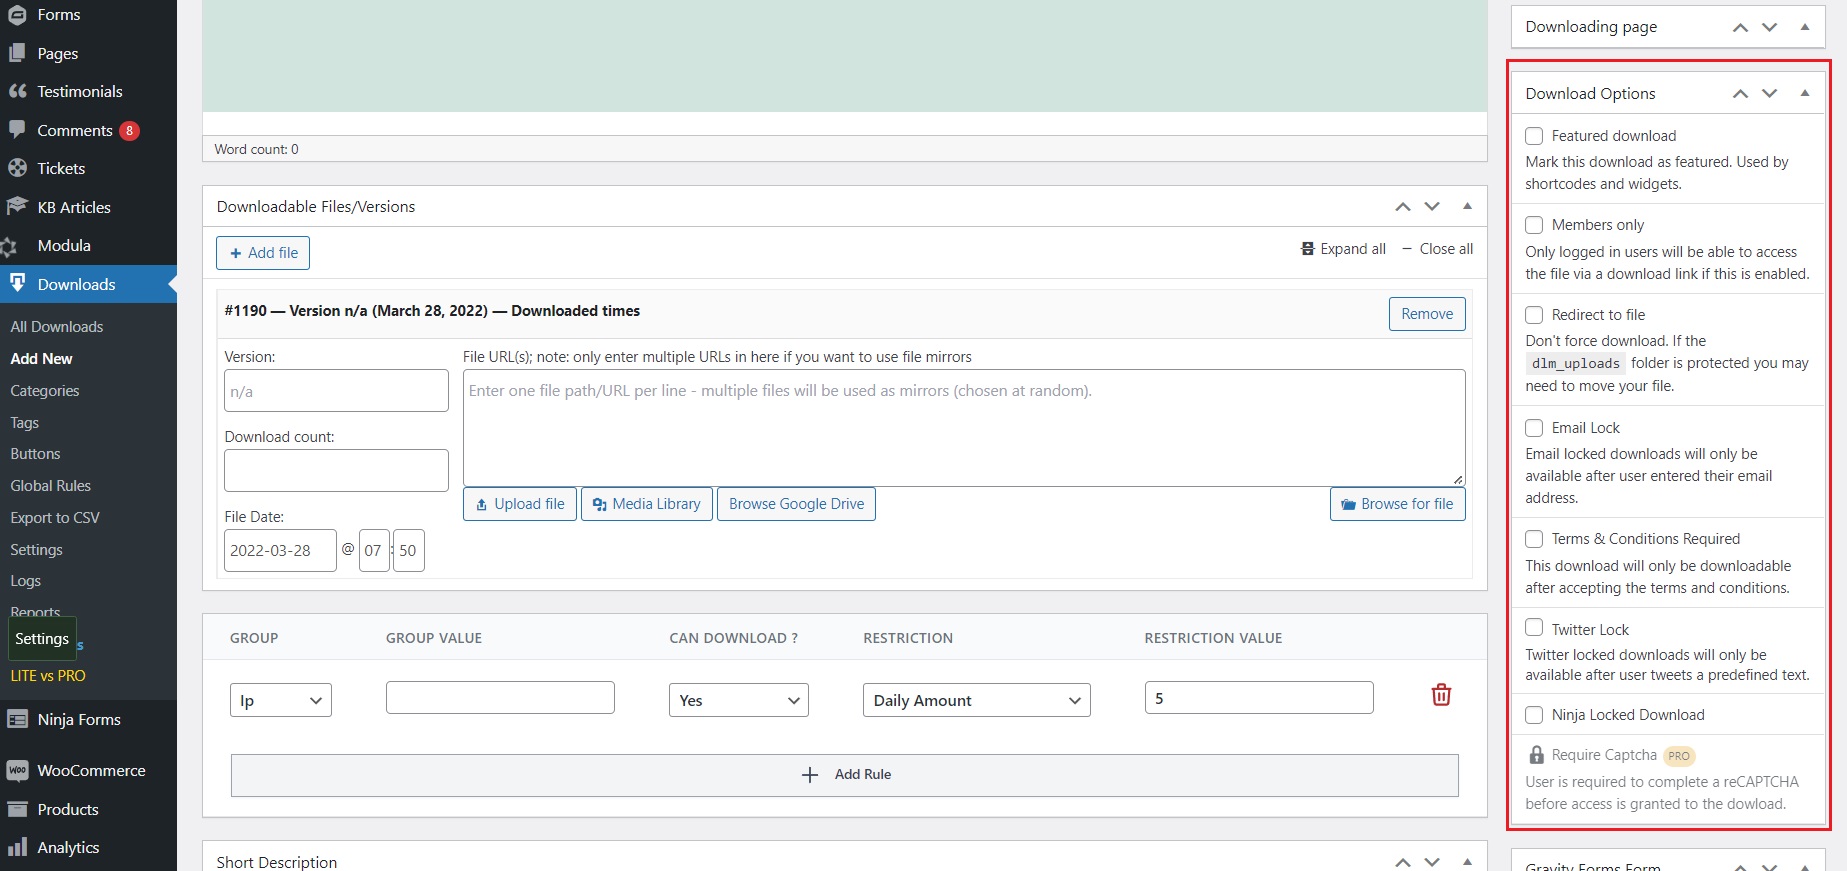
You may also set up download rules with the Advanced Access Manager extension. If you click on the Add Rule button in the Advanced Access Rules section, you’ll notice you can limit your download to specific people. You can even restrict a particular IP address. On top of that, you can even put a daily download limit, a daily limit, or a specific download number to the PDF download link.
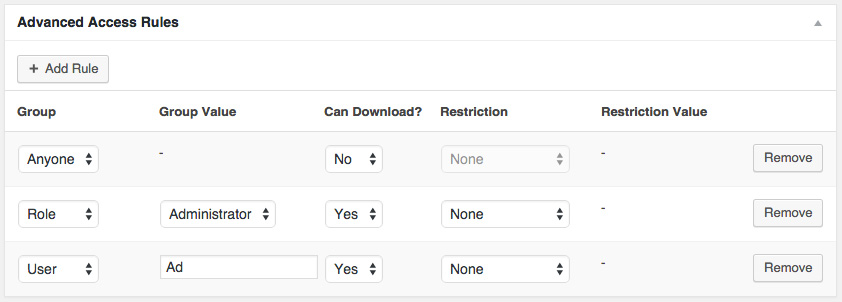
Because the first rule matches ‘everyone’, this rule will always apply to everyone and the rest of the rules will be ignored
The Page Addon extension helps you group your downloads based on the tags you assigned them, the categories, or file type (PDF, images, etc). This particular extension is useful when you’re dealing with a large number of files.
Downloading Options
While on the topic of extensions, when adding a file to be downloaded, you’ll notice on the right side of the page a section called Download Options with a bunch of tick boxes. It’s worth mentioning that not all the tick boxes in Download Options are from extensions. The base options that come with the plugin are Feature Download and Members Only.
You can use the Email Lock extension and tick the box to have users submit their email before letting them download. Then you can add the email to the database to be able to send them newsletters later on.
Looking closely, you’ll also notice a check box labeled Members Only. This will force website visitors to sign up to your website to have access to the downloadable content.
On the right side of the page, you can see a section called Download Tags and Download Categories. This helps you categorize your file based on different types. For example, if you set the “PDF” tag and your user clicks on it, they’ll see all files with that tag. Moreover, if you have an electronics store, you can tag your user manuals based on types: washing machines, TVs, microwaves, etc.
Step 3: Display Your PDF File Download
Displaying your PDF file download is easier than you think. You have two options to choose from: either a clickable URL or a button. You’ll notice on the right side a section called Download Information. There, you’ll find your generated shortcode and URL.
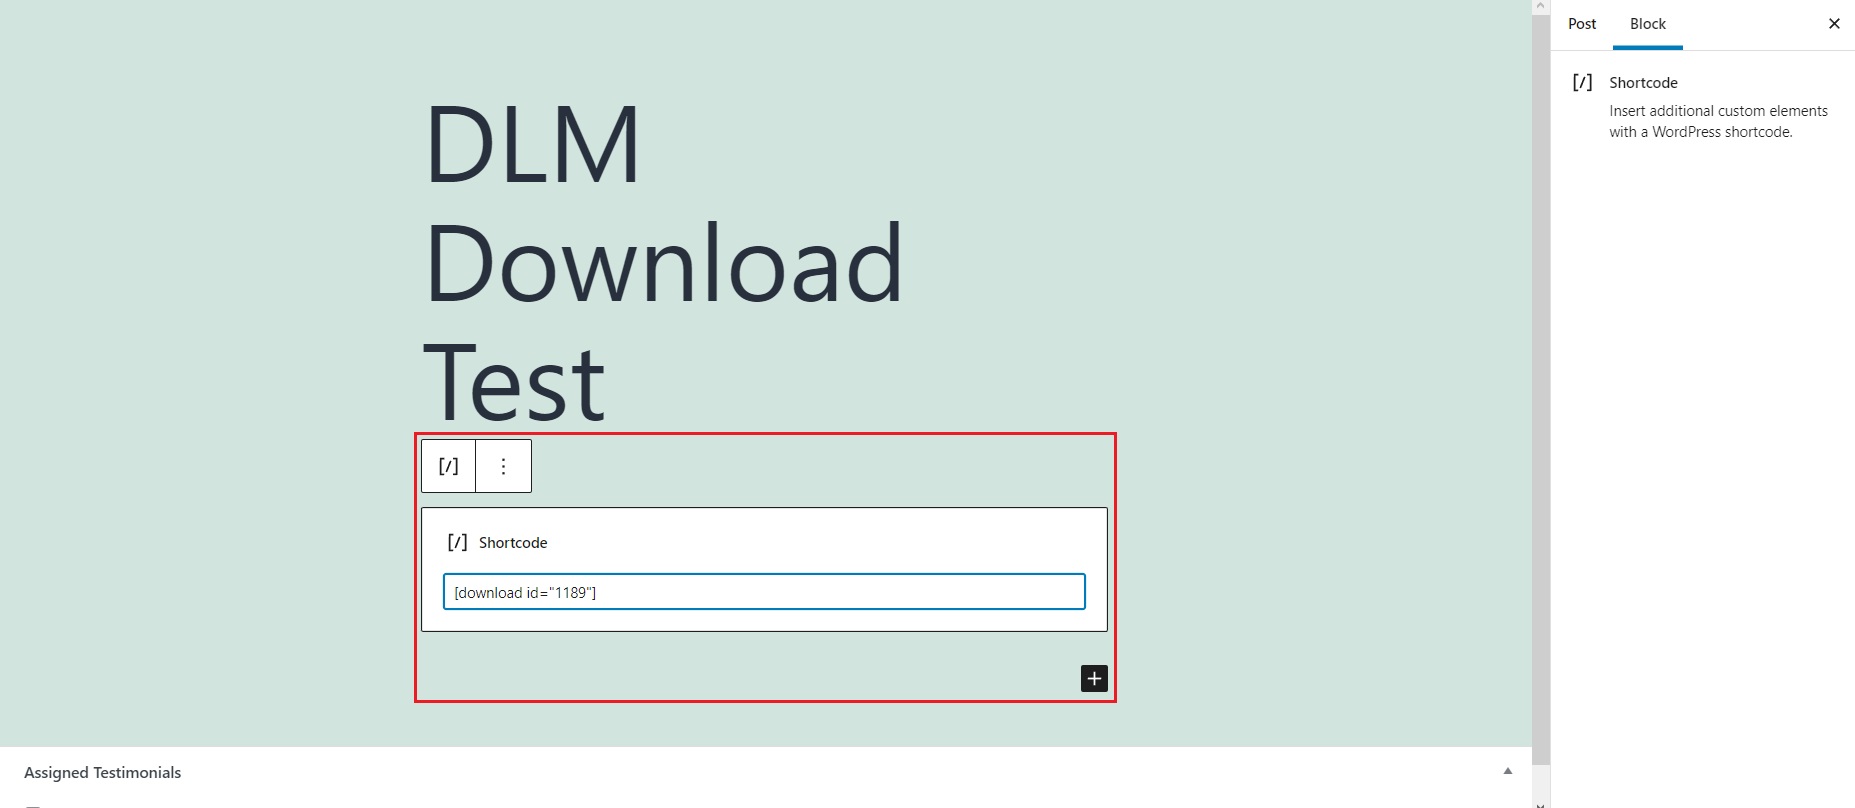
Setting up a clickable URL
After you’ve saved your work so far, copy the generated shortcode. Head over to the post or page where you want to display the link and search for the shortcode block or simply paste the code there.
One thing to note is that the title you assigned to the download file will be the actual text anchor (clickable URL) displayed on the page. It’s that easy to add hyperlinks. People can also use the document link to copy and share it further with other people.
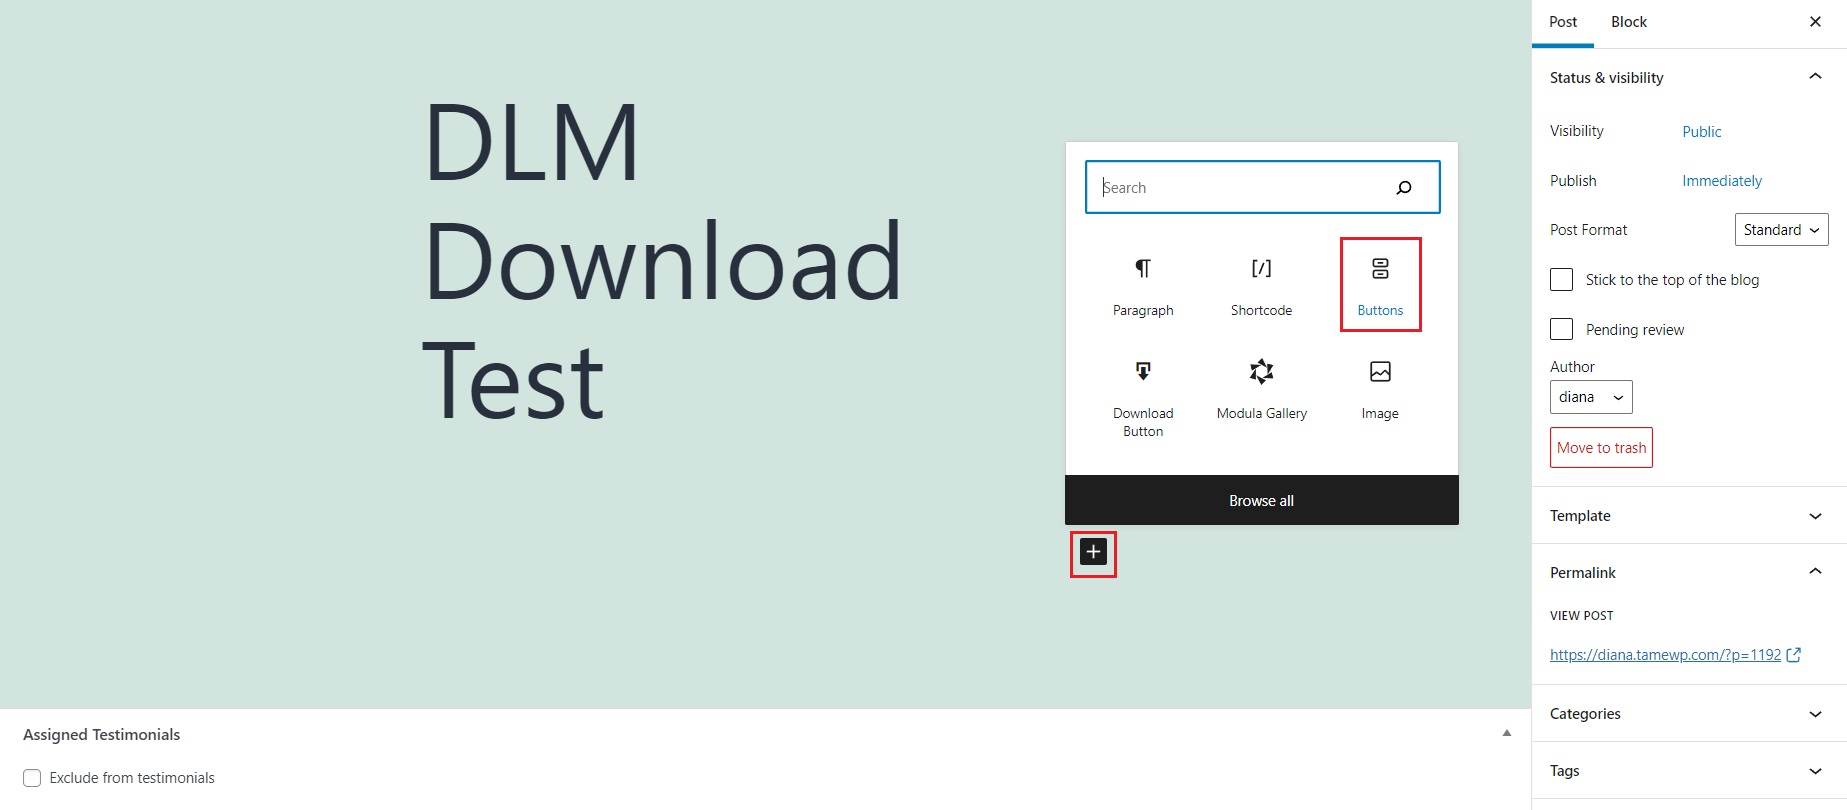
Setting up a download button
This method is as easy as adding hyperlinks, but with a twist. When saving, you also create a URL link. Instead of copying the shortcode, you copy the URL. Head over to the page you want to display the button on and create a simple button by clicking the “+” and searching for that block. You can type inside “Download here!” and add the link to it.
When it comes to buttons, Download Monitor offers you a Buttons extension where you can set up templates, edit and stylize your buttons in many other ways.
To set up a button with the download link, simply copy the URL instead of the Shortcode from the Download Information section. After that, head over to the page you want to display the download button. Search for a button by clicking the “+” and after it’s placed, click on the link icon to insert the URL.
If you wish to customize the buttons even further, head over to Downloads > Buttons. In the text box, give a name to the template and click the Add template button. You’ll be redirected to another page that will contain customization options such as background, border, font, text size, shadow, as well as a preview of your button on the right side.
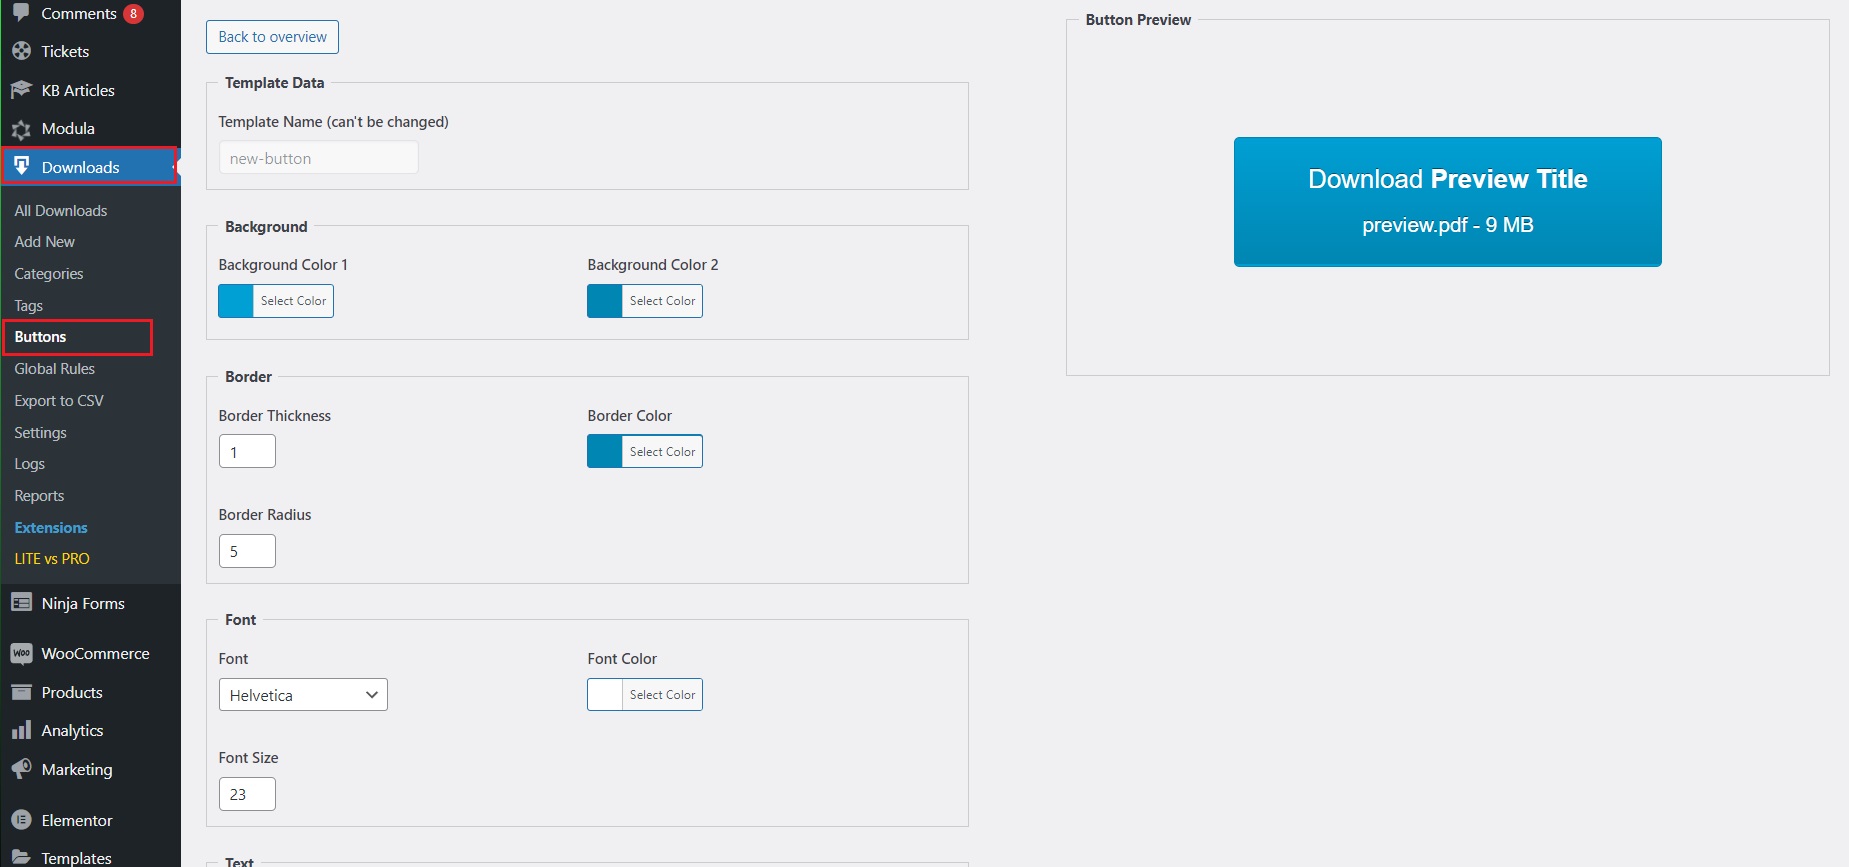
Once you’re happy with the design, hit Save Button. Once your template is saved, you’ll have a shortcode generated in the templates list right next to the template name. Copy the shortcode and head over to your desired page. Search for the shortcode block by pressing the “+” or simply paste the shortcode directly and save the page. Your newly generated button will be displayed.
What happens after clicking “download” on either the clickable URL or the button? The browser either directly forces the download or the user will be redirected to a download page if they have the extension with the same name active.
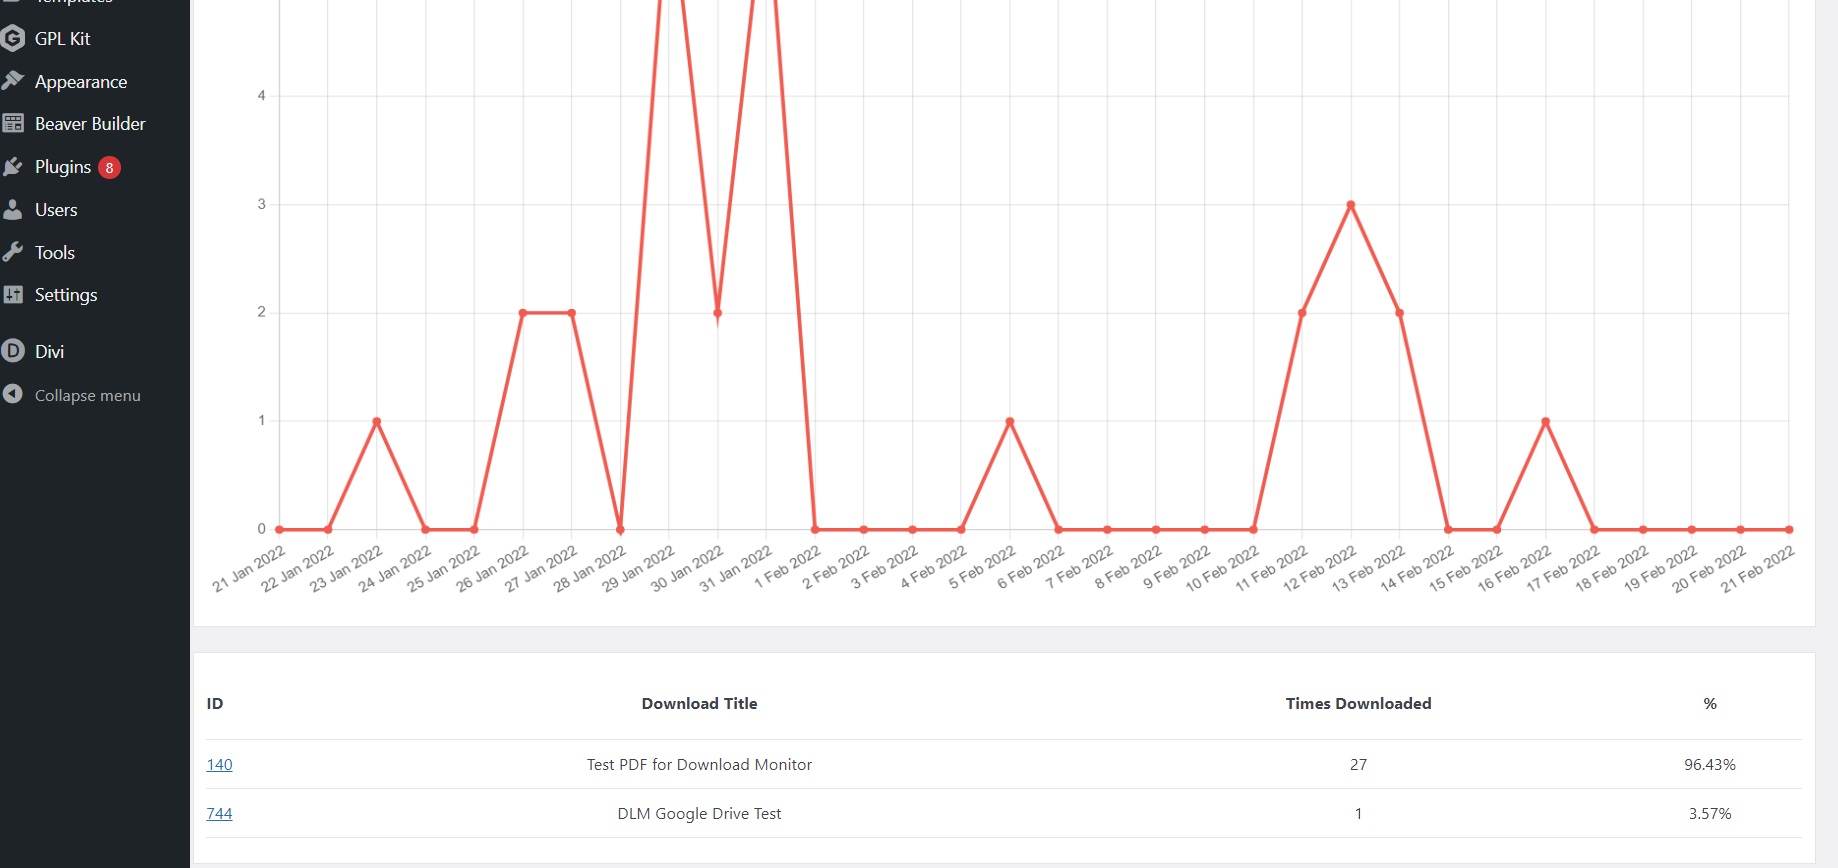
Track your downloads
Once your files are up and running, you can easily track their progress by going to Downloads > Reports. You can see the number of downloads, reports, and even a graph to better visualize the data. This will help you develop your business even more.
A better data collection
Using the Gravity Forms extension, you can easily make a form that users must fill in to access their download. It allows you to understand your user base better and assist with data collection.
As a small side note, if you have the Downloading Page extension active, you may select a redirect page to be displayed as soon as the person clicks on your PDF link or button.
Having a downloading page to redirect your users to is useful in many ways. For example, if you offer your customers a free PDF sample to download (like an e-book), you can redirect them after downloading to another page that can contain offers, vouchers for their next purchase, social media links, and more.
To set up a redirect page after the download, simply head over to Downloads > Settings. From there, select the Advanced tab. There, you’ll find an option called Downloading Page and next to it, a drop-down menu. From that list, you can select the page you want to direct your users to after downloading.
It’s safe to mention that this method is good not only with PDF documents but with Microsoft Word files as well. Microsoft Word software is actually very similar to Google Docs.
Once your clients download the PDF document, they can use Adobe Acrobat to view, manipulate, print, and manage it.
So, How Can Download Monitor Help You?
With Download Monitor, figuring out how to link a pdf to a website is a piece of cake. Here are other benefits of installing this plugin:
1. Allows users to download digital content – Download Monitor helps you set up downloadable digital content quickly and effortlessly, including in PDF format, without the hassle of having to edit your website’s HTML code.
2. Save up space – Worry less about space and cluttering your website. With Download Monitor, you can use Amazon S3 or Google Drive to pull your files from there and keep your website loading times ridiculously low.
3. Data collection – Use forms and special download rules to collect data from your users prior to downloading. You can see what sells and what doesn’t, what people are interested in, and what to focus on when it comes to marketing campaigns.
Conclusion
And there you have it, your answer to how to link a pdf to a website. Offering your users downloadable PDF files straight from your websites is such a piece of cake with Download Monitor. With these easy steps, you can track, restrict, or even manage how many downloads a user can get using its many features with just a few clicks and zero hassle.
Get Download Monitor and everything it has to offer now at a great price!
Download Monitor
Grow your audience, track download performance, and convert your traffic into email subscribers with an easy-to-use digital downloads solution for WordPress.
